What’s your favorite Easter treat? Make these easy and quick Rice Krispie Easter Nests with marshmallows and cereal for a homemade family favorite, perfect for weeknight dinner desserts, save for later
Rice Krispie Easter Nests
Introduction
As Easter approaches, the joy of creating festive treats with family and friends becomes a cherished tradition. Among the many delightful recipes, Rice Krispie Easter Nests stand out for their ease, flavor, and creativity, utilizing everyday ingredients to craft adorable and delicious nests that are perfect for the holiday season. This recipe is a masterclass in simplicity and fun, allowing both children and adults to express their creativity in the kitchen. With just a few ingredients and some basic kitchen tools, you can create these charming treats that are sure to impress at any Easter gathering.
Why This Works
- Flavor balance and ingredient accessibility: The combination of marshmallows, butter, and vanilla extract creates a sweet and satisfying flavor profile, while the use of Rice Krispies cereal adds a delightful crunch. All these ingredients are easily found in most supermarkets, making this recipe highly accessible.
- Ease of preparation: The process of making Rice Krispie Easter Nests is straightforward and quick, requiring minimal cooking and no baking, which makes it perfect for a fun family activity or a last-minute treat.
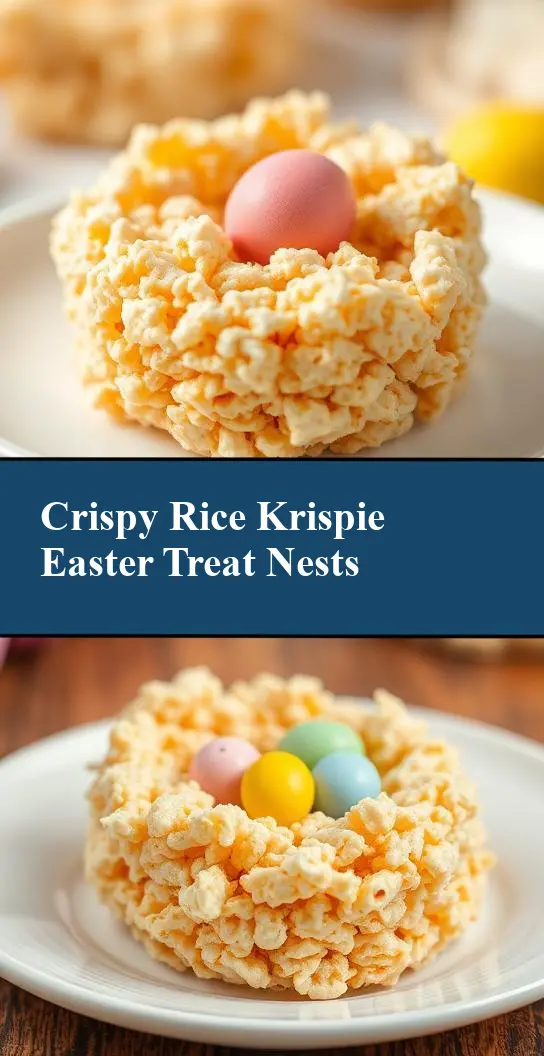
- Impressive results with minimal effort: Despite the simplicity of the recipe, the end result is visually appealing and can be customized with various toppings to resemble Easter nests, filled with chocolate eggs or other small candies, making it a great centerpiece for Easter tables or a lovely gift for friends and family.
Key Ingredients
The main ingredients for Rice Krispie Easter Nests include Rice Krispies cereal, marshmallows, butter or margarine, vanilla extract, and food coloring (optional). For the nests, you will also need shredded coconut or Easter grass (green-colored coconut flakes) to create the grass effect, and small chocolate eggs or candies to fill the nests. Practical substitutions can be made for dietary restrictions, such as using vegan marshmallows or dairy-free butter alternatives, ensuring that everyone can enjoy these treats.
Instructions
- Step 1: Begin by preparing your workspace. Lay out a large piece of parchment paper or a silicone mat where you will shape your nests. If using food coloring to dye your coconut flakes green for a more authentic grass look, do this step first by placing the coconut in a ziplock bag, adding a few drops of green food coloring, and shaking until the color is evenly distributed.
- Step 2: In a large pot or saucepan, melt the butter or margarine over low heat. Add the marshmallows and stir until they are completely melted and the mixture is smooth. Remove from heat and stir in the vanilla extract. If desired, add a few drops of food coloring to tint your nests.
- Step 3: Quickly add the Rice Krispies cereal to the marshmallow mixture and stir until the cereal is evenly coated. The mixture will be sticky, so it’s helpful to butter your hands or use a spatula to mix.
- Step 4: Once the mixture has cooled slightly but is still pliable, use your hands or a spoon to shape into nest shapes on your prepared parchment paper or silicone mat. Press the centers of the nests to create a well for the eggs. Immediately sprinkle shredded coconut or Easter grass around the nests to create the grass effect. Place a few chocolate eggs or small candies in the center of each nest.
Handy Tips
- To avoid the cereal mixture from becoming too hard to shape, work quickly after adding the cereal to the marshmallow mixture. If it does start to harden, you can let it sit for about 30 seconds to a minute and then try to shape it again.
- For a more realistic grass effect, you can also use green-tinted white chocolate shavings or small pieces of green candy melts around the nests.
- Experiment with different types of small candies or chocolates to fill your nests, such as jelly beans, M&M’s, or chopped peanut butter cups, to cater to various tastes.
Heat Control
When melting the marshmallows, it’s crucial to use low heat to prevent them from burning or browning too quickly. Stir constantly to ensure even melting. If using a microwave to melt the marshmallows, do so in short increments (about 30 seconds at a time), checking and stirring until smooth to avoid overheating.
Crunch Factor
The crunch in Rice Krispie Easter Nests comes from the Rice Krispies cereal itself. To maintain this crunch, it’s best to consume the nests within a day or two of making them. If you find that your nests become too soft, it might be due to high humidity or storing them in an airtight container too soon after making. Let them sit out for a bit to firm up before storing.
Pro Kitchen Tricks
- To make the process of shaping the nests easier and less sticky, lightly buttering your hands or the spatula can help. Additionally, having all your ingredients and tools ready before starting can streamline the process.
- For an extra creative touch, consider using different shapes and sizes of chocolate eggs or candies to fill the nests, or adding a few sprinkles around the nests for extra color.
- Cleanup can be made easier by having warm soapy water ready for washing utensils and pots immediately after use, as the marshmallow mixture can harden and become difficult to clean if left to sit.
Storage Tips
- Store Rice Krispie Easter Nests in an airtight container at room temperature for up to 2 days. It’s best not to refrigerate them as the humidity can make the nests soft.
- If you need to store them for a longer period, consider placing them in a single layer in an airtight container and freezing. They can be frozen for up to 2 months. Allow them to thaw at room temperature when you’re ready to serve.
- When storing, it’s a good idea to place parchment paper or wax paper between layers of nests to prevent them from sticking together.
Gift Packaging Ideas
Rice Krispie Easter Nests are perfect for gifting, especially to children. You can package them in small cellophane bags tied with a ribbon, place them in Easter-themed containers or baskets, or even create a DIY Easter basket filled with these treats along with other small toys or candies. For a more personalized touch, consider adding a handmade card or a small decorative pick to each package.
Flavor Variations
- 🌟 Different spices: Adding a pinch of salt or a teaspoon of cinnamon to the marshmallow mixture can give the nests a unique flavor twist.
- 🌟 Creative toppings: Experiment with different types of candy, nuts, or even dried fruits to fill the nests or sprinkle on top.
- 🌟 Ingredient swaps: For a gluten-free version, ensure that your Rice Krispies cereal is gluten-free. You can also use different types of cereal for a varied texture, such as Froot Loops for a colorful effect.
Troubleshooting
- Texture problems: If your nests become too hard, it might be because the mixture cooled too much before shaping. If too soft, it could be due to overmixing or high humidity.
- Ingredient replacements: Always check the ingredient labels if you’re substituting to ensure that the replacements fit the dietary needs of those consuming the nests.
- Over/undercooking signs: The marshmallow mixture should be smooth and evenly melted. If it starts to brown, it’s overheated. Underheated mixture might not hold the nests’ shape well.
FAQs
- Can I freeze it? Yes, you can freeze Rice Krispie Easter Nests for up to 2 months. It’s best to freeze them in a single layer in an airtight container to prevent sticking.
- Is it gluten-free? Traditional Rice Krispies cereal contains gluten, but there are gluten-free versions available. Always check the packaging to ensure it meets dietary requirements.
- Can I double the recipe? Yes, you can easily double or triple the recipe to make more nests. Just ensure you have a large enough pot to handle the increased amount of marshmallows and cereal.
Conclusion
Making Rice Krispie Easter Nests is a fun and engaging activity that brings joy to both the creators and those who get to enjoy them. With their ease of preparation, delightful flavor, and adorable presentation, these treats are sure to become a new Easter tradition. Feel free to experiment with different flavors and toppings to make the recipe your own, and don’t hesitate to share your creations with friends and family. Whether you’re a seasoned baker or a beginner in the kitchen, Rice Krispie Easter Nests are a perfect project to undertake this Easter season.